> ## Documentation Index
> Fetch the complete documentation index at: https://docs.gnosispay.com/llms.txt
> Use this file to discover all available pages before exploring further.
# Partner Secure Elements (PSE) Integration
> Access sensitive Card information from your client application.
## Overview
If you want to display sensitive information, such as card numbers, in your front-end, you'll need to interact with our **Partner Secure Elements (PSE)** service. The easiest way to do this is by using the [PSE SDK](https://www.npmjs.com/package/@gnosispay/pse-sdk) from Gnosis Pay.
To initialize the SDK, you'll need an `App ID` provided to you upon registration with Gnosis Pay. You'll also need an **ephemeral-token**. This ephemeral-token can be retrieved with a call to our private PSE API using mTLS authentication.
**Backend Only**: An mTLS authentication can only be performed from a
back-end. For this reason, you need a back-end responsible for retrieving the
ephemeral-token and sending it to your front-end upon request. We'll go
through each step in this guide.
{" "}
Once your front-end has the ephemeral-token, it can initialize the PSE SDK and use it to display secure elements.
Here's a diagram showing each step:
```mermaid theme={null}
sequenceDiagram
participant FE as Your Frontend
participant BE as Your Backend
participant API as PSE API
FE->>BE: Get ephemeral-token
BE->>API: Get ephemeral-token (mTLS Certificates)
API-->>BE: Receive ephemeral-token
BE-->>FE: Receive ephemeral-token
Note over FE: Initialize PSE SDK with ephemeral-token and App ID
FE->>API: PSE SDK Requests Card Information
API-->>FE: Display Card Information Inside an Iframe
```
Reference implementations are available for a [front-end](https://github.com/gnosispay/ui) and a [back-end](https://github.com/gnosispay/ui/tree/main/pse-backend-demo).
***
## Secure Connection Using mTLS Authentication
**Mutual TLS (mTLS)** is a type of authentication in which two parties in a connection authenticate each other using the TLS protocol. Your back-end will establish an mTLS authentication with the Gnosis Pay private PSE API to receive an ephemeral-token.
### How to Generate mTLS Certificates
After signing up through the [Partners Dashboard](https://partners.gnosispay.com/), you will receive an `App ID` instantly, which will be used in the certificate generation below. You must first create a private key and then generate a Certificate Signing Request (CSR) using the `App ID` as follows:
```graphql theme={null}
# APP_ID is a string starting with `gp_` that you have received from Gnosis Pay
export APP_ID="gp_woop_123"
# Create a private key (NEVER share with anyone)
openssl ecparam -name prime256v1 -genkey -noout -out "${APP_ID}.key.pem"
# Create the CSR (OK to share)
openssl req -new -sha256 -key "${APP_ID}.key.pem" -out "${APP_ID}.csr.pem" -subj "/CN=${APP_ID}"
```
You can now share the `${APP_ID}.csr.pem` file with the Gnosis Pay team. **DO NOT EVER** share the `.key.pem` file with **ANYONE**.
Once we receive your Certificate Signing Request, we will sign it and send you back the signed certificates. These signed certificates, along with your private key, are used to establish the connection with the PSE API.
### How to Establish an mTLS Authentication (in Node.js)
You should securely store the certificates in your environment along with your private key.
Your environment should expose the certificates and private key, for example:
```rust theme={null}
SIGNED_CERTIFICATES="-----BEGIN CERTIFICATE-----
ABCQz ....
-----END CERTIFICATE-----
-----BEGIN CERTIFICATE-----
DEFC7 ....
-----END CERTIFICATE-----
-----BEGIN CERTIFICATE-----
GHICc ....
-----END CERTIFICATE-----"
PRIVATE_KEY="-----BEGIN EC PRIVATE KEY-----
ABCD....
-----END EC PRIVATE KEY-----"
```
Here's a Node.js implementation to request the ephemeral-token in two different ways:
```js Using Axios theme={null}
const httpsAgent = new https.Agent({
cert: process.env.SIGNED_CERTIFICATES,
key: process.env.PRIVATE_KEY,
rejectUnauthorized: true, // Ensure SSL verification
});
const ephemeralTokenRequest = await axios({
httpsAgent: httpsAgent,
method: "POST",
url: `https://api-pse.gnosispay.com/api/v1/ephemeral-token`,
headers: { "Content-Type": "application/json" },
// Axios adds the user-agent automatically
});
```
```js Using https.request theme={null}
import https from "https";
const httpsAgent = new https.Agent({
cert: CERT,
key: KEY,
rejectUnauthorized: true,
});
const req = https.request(
{
hostname: "api-pse.gnosispay.com",
path: "/api/v1/ephemeral-token",
method: "POST",
headers: {
"Content-Type": "application/json",
"User-Agent": "User-Client/1.0.0",
},
agent: httpsAgent,
},
(res) => {
let data = "";
res.on("data", (chunk) => {
data += chunk;
});
res.on("end", () => {
console.log("Status:", res.statusCode);
try {
const parsedData = JSON.parse(data);
console.log("Response:", parsedData);
} catch {
console.log("Raw response:", data);
}
});
}
);
req.on("error", (error) => {
console.error("Request error:", error);
});
req.end();
```
Please refer to our [API documentation](/api-reference/endpoints/generate-a-new-ephemeral-token) on the PSE service for more information about the specific endpoint.
The ephemeral-token, as its name suggests, is valid for a very short time
frame. It is advised to generate a new one for every usage of the SDK.
***
## How to Use the PSE SDK
The PSE SDK will help you display sensitive information. It injects secure iframes into your front-end and exposes callbacks to interact with it. Refer to the [PSE SDK documentation](https://www.npmjs.com/package/@gnosispay/pse-sdk) for instructions and examples.
## How to Customize the Style of Secure Elements in the iframe
For security reasons, the only way to apply custom styling to iframe elements is to prepare and share a **CSS file** with the Gnosis Pay team. This file, named `.css`, will be incorporated into the iframe.
Standard styling is applied to the iframe elements by default. You can override the style of these classes and IDs as needed. Here are some of them:
#### Card Data
* `.pse-container` - A shared class for all iframe containers.
* `#pse-card-data-container` - The main container for displaying card data.
* `.pse-card-field` - The container for each card data field (card number, expiry date, security code).
* `.pse-card-label` - Labels for each field.
* `.pse-card-value` - The container for the actual card data values.
#### Set PIN Form
* `.pse-container` - A shared class for all iframe containers.
* `#pse-set-pin-form` - The main form container.
* `#pse-set-pin-success-container` - The success state container.
* `.pse-set-pin-container` - The base container class.
* `.pse-set-pin-button` - The base class for all buttons.
* `#pse-continue-pin-button` - The continue button.
* `#pse-done-button` - The done button.
***
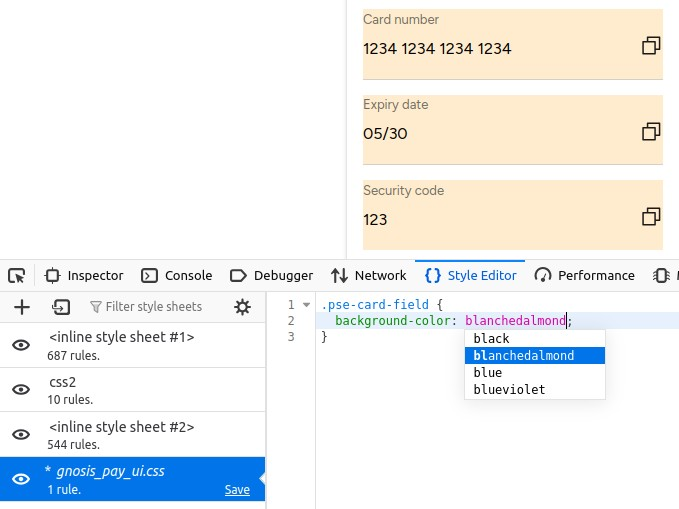
### Styling Guide
Here is a suggested workflow to customize the styling:
1. In your front-end, load the element you wish to customize (e.g., the card data).
2. Locate the custom CSS file with your name in either the "**Style Editor**" in Firefox or the "**Sources**" panel on Chrome/Brave. In the example below, the file is `gnosis_pay_ui.css`.
3. Apply your desired styling. The changes will be reflected in your interface immediately.
4. Save the file and send it to Gnosis Pay for application in production.
Here is an example of overriding the `.pse-card-field` class in Firefox:
 ## React Native Integration
If you'd like to integrate the PSE SDK into a React Native application, you can use the [React Native PSE SDK](https://www.npmjs.com/package/@gnosispay/pse-react-native) package to help integrating the WebView piece.
However, as the PSE requires hosting on your domain, you will still need to host the PSE Frame on your backend, on your domain.
This frame can be as simple as an HTML page that invokes the PSE JS SDK.
In our reference implementation repository, next to the examples of implementing backend endpoint for ephemeral token generation, you can
find [an example of such page](https://github.com/gnosispay/ui/blob/main/pse-backend-demo/src/static/native-webview.html) returned by the same backend that generates the ephemeral token.
Note that this page should be responsible for fetching the ephemeral token from your backend, and passing it to the PSE JS SDK.
You will then pass this URL to the React Native WebView component, through the `webViewUrl` prop, together with other parameters that you can find in the [React Native PSE SDK documentation](https://www.npmjs.com/package/@gnosispay/pse-react-native).
## React Native Integration
If you'd like to integrate the PSE SDK into a React Native application, you can use the [React Native PSE SDK](https://www.npmjs.com/package/@gnosispay/pse-react-native) package to help integrating the WebView piece.
However, as the PSE requires hosting on your domain, you will still need to host the PSE Frame on your backend, on your domain.
This frame can be as simple as an HTML page that invokes the PSE JS SDK.
In our reference implementation repository, next to the examples of implementing backend endpoint for ephemeral token generation, you can
find [an example of such page](https://github.com/gnosispay/ui/blob/main/pse-backend-demo/src/static/native-webview.html) returned by the same backend that generates the ephemeral token.
Note that this page should be responsible for fetching the ephemeral token from your backend, and passing it to the PSE JS SDK.
You will then pass this URL to the React Native WebView component, through the `webViewUrl` prop, together with other parameters that you can find in the [React Native PSE SDK documentation](https://www.npmjs.com/package/@gnosispay/pse-react-native).